springboot启动原理
Spring Boot是什么?
springboot是依赖于spring的,比起spring,除了拥有spring的全部功能以外,springboot无需繁琐 的xml配置,这取决于它自身强大的自动装配功能;并且自身已嵌入Tomcat、Jetty等web容器,集成 了springmvc,使得springboot可以直接运行,不需要额外的容器,提供了一些大型项目中常见的非 功能性特性,如嵌入式服务器、安全、指标,健康检测、外部配置等,
其实spring大家都知道,boot是启动的意思。所以,spring boot其实就是一个启动spring项目的一 个工具而已,总而言之,springboot 是一个服务于框架的框架;也可以说springboot是一个工具,这 个工具简化了spring的配置;
Spring Boot的核心功能
1、 可独立运行的Spring项目:Spring Boot可以以jar包的形式独立运行。
2、 内嵌的Servlet容器:Spring Boot可以选择内嵌Tomcat、Jetty或者Undertow,无须以war包形 式部署项目。
3、 简化的Maven配置:Spring提供推荐的基础 POM 文件来简化Maven 配置。
4、 自动配置Spring:Spring Boot会根据项目依赖来自动配置Spring 框架,极大地减少项目要使用 的配置。
5、 提供生产就绪型功能:提供可以直接在生产环境中使用的功能,如性能指标、应用信息和应用健 康检查。
6、 无代码生成和xml配置:Spring Boot不生成代码。完全不需要任何xml配置即可实现Spring的所 有配置。
Spring Boot启动过程
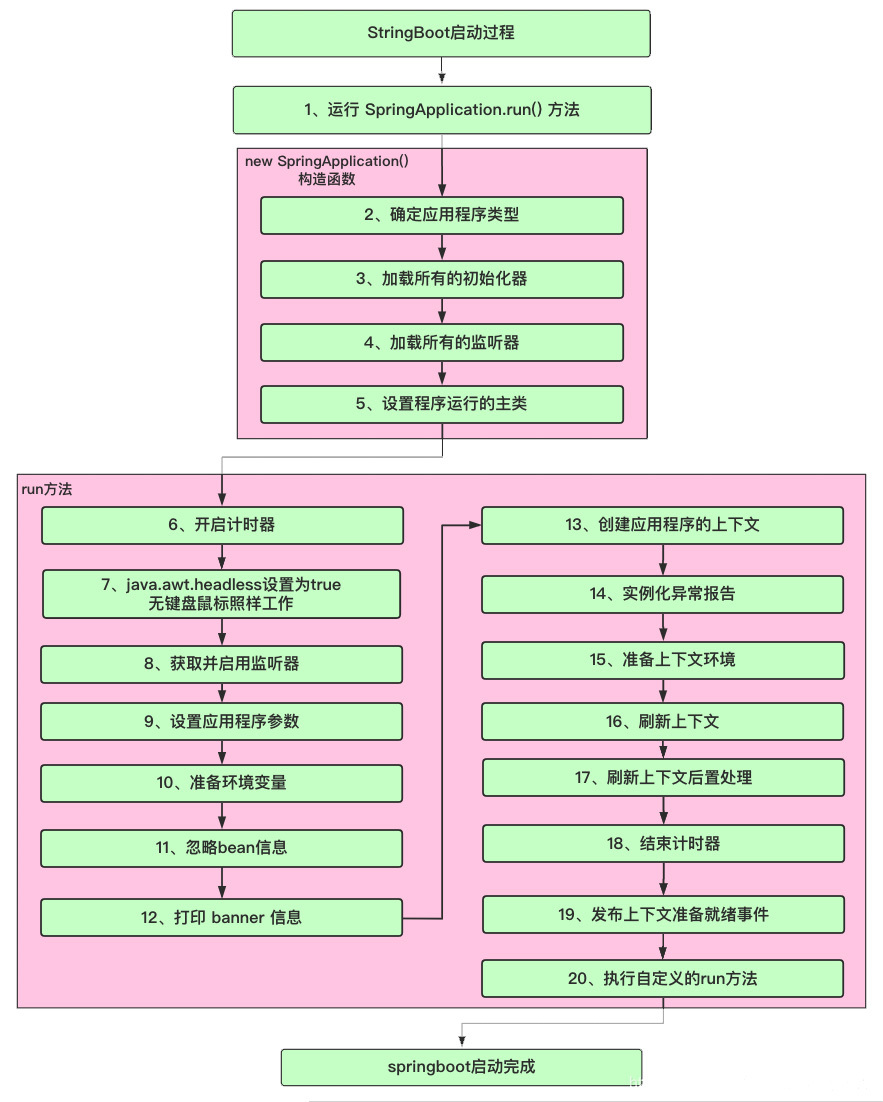
springboot的启动经过了一些一系列的处理,我们先看看整体过程的流程图
你别说,步骤还挺多,但是不要紧,为了帮助大家理解,接下来将上面的编号一个个地讲解,以通俗
易懂的方式告诉大家,里面都做了什么事情,废话不多说,开整
1、运行 SpringApplication.run() 方法
可以肯定的是,所有的标准的springboot的应用程序都是从run方法开始的
1 package com.spring;
2 import org.springframework.beans.factory.config.ConfigurableListableBeanFactory;
3 import org.springframework.boot.SpringApplication;
4 import org.springframework.boot.autoconfigure.SpringBootApplication;
5 import org.springframework.context.ConfigurableApplicationContext;
6
7 @SpringBootApplication
8 public class App {
9
10 public static void main(String[] args) {
11 // 启动springboot
12 ConfigurableApplicationContext run = SpringApplication.run(App.class, args);
13 }
14
15 }
进入run方法后,会 new 一个SpringApplication 对象,创建这个对象的构造函数做了一些准备工 作,编号第2~5步就是构造函数里面所做的事情
1 /**
2 * Static helper that can be used to run a {@link SpringApplication} from the
3 * specified sources using default settings and user supplied arguments.
4 * @param primarySources the primary sources to load
* @param args the application arguments (usually passed from a Java main
method)
5
6 * @return the running {@link ApplicationContext}
7 */
8 public static ConfigurableApplicationContext run(Class<?>[] primarySources,
9 String[] args) {
10 return new SpringApplication(primarySources).run(args);
11 }
2、确定应用程序类型
在SpringApplication的构造方法内,首先会通过 WebApplicationType.deduceFromClasspath();
方法判断当前应用程序的容器,默认使用的是Servlet 容器,除了servlet之外,还有NONE 和
REACTIVE (响应式编程);
3、加载所有的初始化器
这里加载的初始化器是springboot自带初始化器,从从 META-INF/spring.factories 配置文件中加载 的,那么这个文件在哪呢?自带有2个,分别在源码的jar包的 spring-boot-autoconfigure 项目 和 spring-boot 项目里面各有一个
spring.factories文件里面,看到开头是
org.springframework.context.ApplicationContextInitializer 接口就是初始化器了 ,
MyApplicationContextInitializer.java
1 package com.spring.application;
2
3 import org.springframework.context.ApplicationContextInitializer;
4 import org.springframework.context.ConfigurableApplicationContext;
5 /**
6 * 自定义的初始化器
7 */
public class MyApplicationContextInitializer implements
ApplicationContextInitializer<ConfigurableApplicationContext> {
8
9 @Override
 public void initialize(ConfigurableApplicationContext
configurableApplicationContext) {
10
11 System.out.println("我是初始化的 MyApplicationContextInitializer...");
12 }
13 }
在resources目录下添加 META-INF/spring.factories 配置文件,内容如下,将自定义的初始化器注册 进去;
1 org.springframework.context.ApplicationContextInitializer=\
2 com.spring.application.MyApplicationContextInitializer
启动springboot后,就可以看到控制台打印的内容了,在这里我们可以很直观的看到它的执行顺序, 是在打印banner的后面执行的;
4、加载所有的监听器
加载监听器也是从 META-INF/spring.factories 配置文件中加载的,与初始化不同的是,监听器加载 的是实现了 ApplicationListener 接口的类
自定义监听器也跟初始化器一样,依葫芦画瓢就可以了,这里不在举例;
5、设置程序运行的主类
deduceMainApplicationClass(); 这个方法仅仅是找到main方法所在的类,为后面的扫包作准备,
deduce是推断的意思,所以准确地说,这个方法作用是推断出主方法所在的类;
6、开启计时器
程序运行到这里,就已经进入了run方法的主体了,第一步调用的run方法是静态方法,那个时候还没 实例化SpringApplication对象,现在调用的run方法是非静态的,是需要实例化后才可以调用的,进 来后首先会开启计时器,这个计时器有什么作用呢?顾名思义就使用来计时的嘛,计算springboot启 动花了多长时间;关键代码如下:
1 // 实例化计时器
2 StopWatch stopWatch = new StopWatch();
3 // 开始计时
4 stopWatch.start();
7、将java.awt.headless设置为true
这里将java.awt.headless设置为true,表示运行在服务器端,在没有显示器器和鼠标键盘的模式下照 样可以工作,模拟输入输出设备功能。
做了这样的操作后,SpringBoot想干什么呢?其实是想设置该应用程序,即使没有检测到显示器,也允许其 启动.对于服务器来说,是不需要显示器的,所以要这样设置. 方法主体如下:
1 private void configureHeadlessProperty() {
System.setProperty(SYSTEM_PROPERTY_JAVA_AWT_HEADLESS,
System.getProperty(
2
SYSTEM_PROPERTY_JAVA_AWT_HEADLESS, Boolean.
(this.headless)));
3
4 }
通过方法可以看到,setProperty()方法里面又有个getProperty();这不多此一举吗?其实 getProperty()方法里面有2个参数, 第一个key值,第二个是默认值,意思是通过key值查找属性值, 如果属性值为空,则返回默认值 true;保证了一定有值的情况;
8、获取并启用监听器
这一步 通过监听器来实现初始化的的基本操作,这一步做了2件事情
1.创建所有Spring运行监听器并发布应用启动事件
2.启用监听器
9、设置应用程序参数
将执行run方法时传入的参数封装成一个对象
仅仅是将参数封装成对象,没啥好说的,对象的构造函数如下
1 public DefaultApplicationArguments(String[] args) {
2 Assert.notNull(args, "Args must not be null");
3 this.source = new Source(args);
4 this.args = args;
5 }
那么问题来了,这个参数是从哪来的呢?其实就是main方法里面执行静态run方法传入的参数,
10、准备环境变量
准备环境变量,包含系统属性和用户配置的属性,执行的代码块在 prepareEnvironment 方法内 打了断点之后可以看到,它将maven和系统的环境变量都加载进来了
11、忽略bean信息
这个方法configureIgnoreBeanInfo() 这个方法是将 spring.beaninfo.ignore 的默认值值设为true, 意思是跳过beanInfo的搜索,其设置默认值的原理和第7步一样;
1 private void configureIgnoreBeanInfo(ConfigurableEnvironment environment) {
2 if (System.getProperty(
3CachedIntrospectionResults.IGNORE_BEANINFO_PROPERTY_NAME) == null) {
4Boolean ignore =
environment.getProperty("spring.beaninfo.ignore",
5 Boolean.class, Boolean.TRUE);
System.setProperty(CachedIntrospectionResults.IGNORE_BEANINFO_PROPERTY_NAME,
6
7 ignore.());
8 }
9 }
当然也可以在配置文件中添加以下配置来设为false
1 spring.beaninfo.ignore=false
目前还不知道这个配置的具体作用,待作者查明后在补上
12、打印 banner 信息
显而易见,这个流程就是用来打印控制台那个很大的spring的banner的,就是下面这个东东
那他在哪里打印的呢?他在 SpringBootBanner.java 里面打印的,这个类实现了Banner 接口,
而且banner信息是直接在代码里面写死的;
有些公司喜欢自定义banner信息,如果想要改成自己喜欢的图标该怎么办呢,其实很简单,只需要在 resources目录下添加一个 banner.txt 的文件即可,txt文件内容如下
一定要添加到resources目录下,别加错了
只需要加一个文件即可,其他什么都不用做,然后直接启动springboot,就可以看到效果了
13、创建应用程序的上下文
实例化应用程序的上下文, 调用 createApplicationContext() 方法,这里就是用反射创建对象,没什
么好说的;
14、实例化异常报告器
异常报告器是用来捕捉全局异常使用的,当springboot应用程序在发生异常时,异常报告器会将其捕 捉并做相应处理,在spring.factories 文件里配置了默认的异常报告器,
需要注意的是,这个异常报告器只会捕获启动过程抛出的异常,如果是在启动完成后,在用户请求时 报错,异常报告器不会捕获请求中出现的异常,
了解原理了,接下来我们自己配置一个异常报告器来玩玩;
MyExceptionReporter.java 继承 SpringBootExceptionReporter 接口
1 package com.spring.application;
2
3 import org.springframework.boot.SpringBootExceptionReporter;
4 import org.springframework.context.ConfigurableApplicationContext;
5
6 public class MyExceptionReporter implements SpringBootExceptionReporter {
7
8
9 private ConfigurableApplicationContext context;
10 // 必须要有一个有参的构造函数,否则启动会报错
11 MyExceptionReporter(ConfigurableApplicationContext context) {
12 this.context = context;
13 }
14
15 @Override
16 public boolean reportException(Throwable failure) {
17 System.out.println("进入异常报告器");
18 failure.printStackTrace();
19 // 返回false会打印详细springboot错误信息,返回true则只打印异常信息
20 return false;
21 }
22 }
在 spring.factories 文件中注册异常报告器
1 # Error Reporters 异常报告器
2 org.springframework.boot.SpringBootExceptionReporter=\
3 com.spring.application.MyExceptionReporter
接着我们在application.yml 中 把端口号设置为一个很大的值,这样肯定会报错,
1 server:
   2   port: 80828888
15、准备上下文环境
这里准备的上下文环境是为了下一步刷新做准备的,里面还做了一些额外的事情;
15.1、实例化单例的beanName生成器
在 postProcessApplicationContext(context); 方法里面。使用单例模式创建 了 BeanNameGenerator 对象,其实就是beanName生成器,用来生成bean对象的名称
15.2、执行初始化方法
初始化方法有哪些呢?还记得第3步里面加载的初始化器嘛?其实是执行第3步加载出来的所有初始化 器,实现了ApplicationContextInitializer 接口的类
15.3、将启动参数注册到容器中
这里将启动参数以单例的模式注册到容器中,是为了以后方便拿来使用,参数的beanName 为 : springApplicationArguments
16、刷新上下文
刷新上下文已经是spring的范畴了,自动装配和启动 tomcat就是在这个方法里面完成的,还有其他的 spring自带的机制在这里就不一一细说了,
17、刷新上下文后置处理
afterRefresh 方法是启动后的一些处理,留给用户扩展使用,目前这个方法里面是空的,
1 /**
2 * Called after the context has been refreshed.
3 * @param context the application context
4 * @param args the application arguments
5 */
6 protected void afterRefresh(ConfigurableApplicationContext context,
7 ApplicationArguments args) {
8 }
18、结束计时器
到这一步,springboot其实就已经完成了,计时器会打印启动springboot的时长
在控制台看到启动还是挺快的,不到2秒就启动完成了;
19、发布上下文准备就绪事件
告诉应用程序,我已经准备好了,可以开始工作了
20、执行自定义的run方法
这是一个扩展功能,callRunners(context, applicationArguments) 可以在启动完成后执行自定义的 run方法;有2中方式可以实现:
1.实现 ApplicationRunner 接口
2. 实现 CommandLineRunner 接口
接下来我们验证一把,为了方便代码可读性,我把这2种方式都放在同一个类里面
1 package com.spring.init;
2
3 import org.springframework.boot.ApplicationArguments;
4 import org.springframework.boot.ApplicationRunner;
5 import org.springframework.boot.CommandLineRunner;
6 import org.springframework.stereotype.Component;
7
8 /**
9 * 自定义run方法的2种方式
10 */
11 @Component
12 public class MyRunner implements ApplicationRunner, CommandLineRunner {
13
14 @Override
15 public void run(ApplicationArguments args) throws Exception {
16 System.out.println(" 我是自定义的run方法1,实现 ApplicationRunner 接口既可运行"
 );
17 }
18
19 @Override
20 public void run(String... args) throws Exception {
 System.out.println(" 我是自定义的run方法2,实现 CommandLineRunner 接口既可运行"
 );
21
22 }
23 }
启动springboot后就可以看到控制台打印的信息了
版权所属:SO JSON在线解析
原文地址:https://www.sojson.com/blog/505.html
转载时必须以链接形式注明原始出处及本声明。
如果本文对你有帮助,那么请你赞助我,让我更有激情的写下去,帮助更多的人。


